Sunday, July 15, 2012

Oh target you have done it again!

I saw Mrs Hahn Daydreams post on Target and decided to share some of my findings as well.
{love her blog by the way}
Of course this time of year the school supply cuteness emerges and makes it almost impossible not to think about the classroom.

First off this three cup turny thing and the & sign
Lets just say that I saw the & sign in the spring and stalked it all the way to July when it went on clearance. What Language Arts teacher doesn't need this?
The revolving metal cups will most likely be turned into a editing station for writing...pencils, highlighters and what not


I have learned my lesson a couple of times about the dollarish section of Target
{smart thinking putting it right where you walk in}
Yep, I most certainly could not avoid these four things
cork board
chalk board
magnetic board
bird hooks
{and Rue hunting for some lizards}

I plan on covering the pink metal board with fabric
These items could end up in the classroom or above my desk at home

Oh and Target has fun colored paper straws

So have any of you found some fantastic Target finds lately?

Monday, July 9, 2012

Glitter smitter

Fourth of July was full of some extra sparkle with the help of some glitter.
I have been seeing this hall pass on Pinterest floating around and of course I decided to make one of my own. I am not too fond of writing students passes and this seemed like a simple solution. Pin a clothes pin on their collar and they are free to leave.
 Supplies
permanent maker
clothes pin
brushes
ribbon
wood
paint
I debated on the design and how to handle the letters
{paint, don't paint, dots, swirls, lines}
After a week I decided on zig-zags and letters I found at Michael's
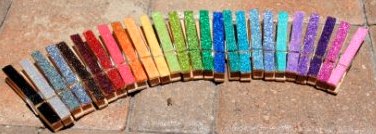
With the left over clothes pins I decided to cover them with glitter and put magnets on the back of them for use on the white board.
 I am not the biggest fan of glitter due to the fact that once you touch glitter it will stay with you. I learned a tip on how to keep the glitter off you hands. Once the glitter is dry cover the glittery surface with decoupage. The decoupage creates a seal on the glitter.


Sunday, July 8, 2012

June's Birchbox

{Birch Box's theme was jet setting}
TheBalm cosmetics Stainiac
Tili Bags Small Collection 1
Masquelogy pore minimizing mask
Stila one step bronzer
Comodynes self-tainning intensive wipes
John Varvatos Star U.S.A 1.7 oz

All in all I felt kind of blah with this box. I thought it was cute, but nothing worth jumping up and down for. Truth be told I have not had any interest in trying these items. I am giving my sister the Stilla bronzer. I do want to try the face mask when I get the time.

Rumor has it July's box theme is Glamour magazine


Thursday, July 5, 2012

H54F: Numero Uno

I have been loving high five for Friday from the blog From My Grey Desk. So I decided to join in the festivities! 
 surprise text from B&BW for $8 candles
 Finally hunted down these two books for my classroom...Hello poetry
 Planning a yarn/string mural for my classroom wall
 Ikea trip with my mom
Ruth learned a new "trick" we hide Easter eggs filled with her dog food around the living room and she will hunt them out and open them. We are pretty impressed with her!

I hope you all had a fabulous week as well as a festive 4th of July! Now on to a fantastic weekend!

Monday, July 2, 2012

Ombre Chandelier

This was a tedious project to put it nicely
{only took a day and a half to assemble}
I came across this project on pinterest through the blog Hey Gorgeous. She does a wonderful job of step-by-step pictures for creating this ombre chandelier. Not only are the pictures helpful, but the directions as well.
Supplies
paint strips
Am I the only one who feels like I am commiting a crime when I take a handful of these. I picked various shades of green for my chandelier
 Lamp shade
I went to Good Will twice to find this scalloped shade. You will remove all fabric leaving just the metal rim.
Puncher-outer
{insert correct name here}

You will also need:
scissors
thread
ribbon
tape

Once all the paint chips are punched out start asembling each row. I layed mine out on the table color side down and taped them all together. The reason why I taped them together is so they will hang flat. Other wise they will go whatever way they please! I started with the bottom layer first and then started the top.
As you can see you are going to flip the lamp shade and work your way outward. I found tying each strand on was easier if the chandelier was hanging.
All in all this project turned out nicely. I am dreading transporting it back home and then to school as it is a tad bit delicate! As long as no one touches it or a strong wind does not come by we should be fine.


Monday, June 25, 2012

Fruit in a cup

In an attempt not to blow away and stay dry from tropical storm Debbie there have been several projects in the making; including one that can be eaten!
 The eaten treat was of course discovered through Pinterest
I thought these cupcake fruit pizzas were too cute and simple to make
Ingredients
Pillsbury pre-made sugar cookie dough you find in the refrigerator section
16 oz. of cool whip
8 oz. of cream cheese
various fruit
Roll the dough in to mini balls and press a tbs into the dough to make a cup
Allow the cups to cool and pop out the cookie cups.
While the cookies are baking mix the cool whip and cream cheese together until it is smooth.
 To reduce the amount of filing into the cup I put fruit in the bottom and covered them with the cool whip & cream cheese concoction
Add some fruit to the top and you are done!

Here is a sneak peak of a classroom project


Saturday, June 23, 2012

Fibonacci Poetry

Let's just get one thing straight I am not the biggest math lover. I typically stop listening to people when math words spew out of their mouths.
Well I have had the privilege of being a part of the National Writing Project and through this I have discovered countless tools and lessons to increase my students, as well as my own, writing.

This workshop allows teacher to learn from other teachers
//Which I love\\
Each teacher is required to present a best practice lesson in writing.
One teacher presented how to integrate poetry into math. I thought this demonstration was going to be ruined because it incorporated math, but I was surprisingly wrong. The presenter read the following book Growing Patterns, Fibonacci Numbers in Nature.
I would try to explain what Fibonacci is, but as I said I do not speak math. Basically there are patterns in nature that follow a sequence that relates to math. The teacher went on to explaining that a poem can be written following the Fibonacci experience.

A Fibonacci poem is similar to Haiku by counting out syllables and relating to nature. Here are the syllables per line: 1, 1, 2, 3, 5, 8, 13, 13, 8, 4, 3, 2, 1, 1

FLORIDA AFTERNOONS

Drip
drop
falling
from the sky
grey painted low clouds
pouring down clear tears from above
intense thunder looms far away waiting for a strike
flash of gold crashing down causing dancing sparks to fly
puddles forming, grey clouds parting
colors showing
promises
rainbow
glow
now


Monday, June 18, 2012

A little touch up

I am a little particular when it comes to my personal calendar.
I like to see a month at a time and stray away from the day to day calendars
{I look at the big picture instead of all the details}
So finding the cutest planner is not easy when you are looking for a practical/affordable one.

I have been lucky enough to find this Mead planner two years in a row.
It meets two out of my three demands:
Cheap...under $10
One month at a time
Unfortunately it is not that pretty to look at, but easy to jazz up a bit!
Supplies for the touch up:
Scrap book paper
Scissors
Ruler
The Mead calendar comes with a clear plastic sleeve which is perfect to slide and type of paper in! What was once plain and boring is now pretty!

Monday, June 11, 2012

Flying Book

Another project complete and I have a little confession to make: I tend to lean towards projects that need to hang from something.
{Oh well}
For this project, which was of course inspired by pinterest, required that I hunt down an old book. I went around from Goodwill to Goodwill in search of the perfect old book. I found a nice looking "Three Musketeers" book that the binding was all ready falling apart...which I was going to remove any ways.
Supplies
Old book
exacto knife
hot glue gun
clear string
scissors
There was a little trial and error as I figured out the best way to loop the pages together and at the same time stay connected. I worked with two pages at a time; looping one, hot glue, loop the other and hot glue...repeat several times. Then came the part where I had to attach the pages to the actual book; which was not that bad just hot glue the pages to the binding.
I must apologize for the lack of pictures, I brought my camera home for the summer, but left the computer cord at the other house. Thankfully, I found another blog that gives step by step instruction for this project. Unfortunately, I discovered these instructions half way through me being done. 
I really like the way this book mobile turned out! This hanging book will be a nice addition to the reading corner in my room


Thursday, June 7, 2012

Another project funded

My students will be receiving and reading Flipped come this fall.
I have been wanting to read an actual novel with my students instead of literature stories in our literature book.

Now do not get me wrong the literature stories are great, but I am getting a little tired of them and would like to try something new. Plus my students will also be able to watch Flipped the movie after they read the book and make connections between media and text.

In celebration of my project being funded I created my 6th project on to Donors Choose for Nooks!
If you would like to donate or take a look click on the Nook

I strongly encourage any teacher to post a project through

First off its FREE!
Second you bring in resources into your classroom without any out of pocket cost!
It's a win win situation!
With all five of my projects I have brought in
1,345
of resources into my classroom
Not too shabby

Wednesday, June 6, 2012

All about them

{Long lost post from the beginning of the year}
 At the beginning of the school year I had all three grade levels create an all about me project.

This project had three parts
Part One: Essay...which was only three paragraphs
//I decided to go easy on them with the first writing assignment\\
Part Two: self-portrait
//with only crayons\\
Part Three: identify the parts of speech within their essay
//They were less enthused about this\\
My favorite essay by far is by Mr. L
Here are some classic lines from his essay
"I hate eating white soggy bread"
"My brother thinks he is smarter than me, but we all know he is a fool"
"Everyone pronounces my name wrong and I don't understand why"

Monday, June 4, 2012

DIY Wood Chalkboard

I originally came across this little jem on Pinterest and discovered where it originated Smashed Peas and Carrots
I had no idea where to get a tree stump and was about to venture out in the woods when Mrs. Hahn Daydreams told me I could find pieces of wood at Michael's. So instead of heading out in the woods I headed towards Michael's to gather supplies.
{What you will need}
Tree stump ($10)
Ribbon ($1)
Sponge brush (.25)
Tape (garage)
Chalkboard paint ($6)
Following suit of Smashed Peas and Carrots mom I created an outline with tape for the chalkboard boarder. Because Lord knows I cannot paint a straight line to save me life.
Then you paint once let dry for an hour
paint twice and dry for 24 hours
Finally after all that drying you can condition your chalkboard by rubbing a piece of chalk over the chalkboard paint. I found the colored chalkboard paint at Michael's. They also had other colors besides teal.
I plan on hanging this little jem in my classroom come the new school year

Sunday, June 3, 2012

The gathering of supplies

Based on my post "let the crafting begin" I have been gathering various supplies to see these little gems come to life.
By Monday I will be revealing how one of the projects turned out!
{Pinterest inspired}